this blog is a side-project!
i do not view this blog or my website as a representation of the quality of my work.
customers require 110% of my time and efforts,
since i still want to be helpful for my fellow programmer colleagues and potential competitors, i’m dedicating some of the little free time i have into the actual content of the blog and not styling/theming or images that i’m drawing.
Or: building a confirm external webpage modal dialog with angular directives
Or: angular global directive for links
Or: get target url from pointerevent
Well, as the title suggests, i had a pretty duckin’ long day so i’ll make this as short as possible given the complexity of my research.
I’m going to explain what i was doing, and how i solved the problem, at the same time, i want to mention that i come from the world of EmberJS, where things are easy, nice, beautiful and also horrifying at the same time.. still easier to handle than googles product in my eyes, but i digress.
The task was to have a modal pop-up on every external link on an angular app.
My first thought was to add a click handler to external links only, but that’s obviously a dumb idea so i didn’t even start with that.
I looked up a solution to my problem and quickly found @Directives in Angular.
They sounded like the real thing, i implemented an externalUrlPrompt directive and generated a component to show inside a modal.
Hooked up MatDialog with the component and put the directive on a link to check it out.
What happened?
If you click the link, the dialog will pop up, but the click will still execute and open the external website in a new tab, hiding the popup.
Not ideal, so what was the problem?
I needed the “click” event, and stop it from executing.
Looking into the documentation, i found “HostListeners” do exactly what i need, they’ll listen to a specific event executed on the directive.. beautiful.
@HostListener(‘click’, [‘$event’]) onClick($event:Event)
{
//my event is named $event because angular requires typescript because
//[REDACTED]
//anyway, you’ll want to stop the event executing by preventing its default action
//like so:
$event.preventDefault();//and then run the modal
const dialogRef = this.dialog.open(ExternalUrlDialogComponent); return dialogRef.afterClosed().subscribe(result => {
//i return the result here
}
}
Now, the next problem is that if the dialog result is “true”, i want to continue to the target page, but i prevented the event from propagating and there’s no “continue” function for that…
so i tried to clone the event before like this:
 const  originalEvent = event;

 const cloned = new PointerEvent('click', event);
And in the case the dialog result is true, i’d just execute
originalEvent.target?.dispatchEvent(cloned);
Looks fine, but trying it out will lead to an endless loop,
the manually triggered clone-event will just ping the HostListener and restart the whole ordeal.
Well.. let’s continue, shall we?
I needed a way to navigate to the target page, so i needed the target page url…
turns out that the event actually contains that.
If you cast the $event.target into an actual “Element”, it’ll have a little more useful functionality.
const target = $event.target as Element;
now target has a “closest” function that you can call to look for a specific HTML tag.
This tag contains the “href” attribute which has the URL we are looking for.
let uri = target.closest('a')?.href ?? '';Now we are getting somewhere.
We have a directive that listens to clicks, it stops the click event, takes the URL content from the clicked element, and in case the user really wants to leave your beautiful website, he can be lead there now by calling
window.location.href = uri;if he does not, we don’t really need to do something, but to be clean, i still call
$event.stopPropagation();
Works like a charm, but considering the fact that this application is pretty big, it’s still a dumb idea to look up every external url reference and add the directive, especially if i leave the position of developer at some point and people just forget to add the directive in the future.. no wai.
So what needs to happen?
Currently, the directive is on all external elements, alternatively, we could add the directive to ALL link elements by default, which is not a good idea, instead, it would be good to have the directive applied to all link elements on the whole application by default, and then filter for external websites.
How to we do that?
It’s easy, just change the directive selector to this:
@Directive({
  selector: 'a'
})
Now, the listener will be called on all calls of the “a” element, we just need to add a filter.
Since we already know how to retrieve the URL from the target, we can use the application host name to filter for the host, and if needed, manually add more allowed hosts.
    let uri = target.closest('a')?.href ?? '';
    if(!uri.includes(location.hostname))
    {
      this.showModal($event);
    }
Now, location is a global variable which provides the hostname, if the URL does not contain the hostname, it’s most likely external.
You might want to extend that to a list, anyway, this is a good solution.
Now let me show the whole thing so people have something to copy-paste, i will not be including the logic for the dialog, because i might do another post especially on how to integrate material dialogs with components, but i’m sad, and tired now.
import {MatDialog, MatDialogRef, MAT_DIALOG_DATA} from '@angular/material/dialog';
import { MyOwnModalComponent} from 'redacted';
import { Directive } from '@angular/core';
import { HostListener, Component } from "@angular/core";


@Directive({
  selector: 'a' //global a selector, yay
})
export class MyUrlPromptDirective {

  constructor(public dialog: MatDialog) {}

   @HostListener('click', ['$event']) onClick($event:Event){


    const  oEvent= $event;
    const target = oEvent.target as Element;


    let uri = target.closest('a')?.href ?? ''; //verify if this always exists
    if(!uri.includes(location.hostname))
    {
      this.showModalDialog($event);
    }


}


showModalDialog(event:Event) {

  const  oEvent= event;
  const target = oEvent.target as Element;


  oEvent.preventDefault();


  const dRef = this.dialog.open(MyOwnModalComponent);
  return dRef.afterClosed().subscribe(result => {
    return Promise.resolve(result).then(function(dRes){
      if(dRes) //if user wants to leave
      {

        let uri = target.closest('a')?.href ?? '';
        window.location.href = uri; //navigate to target

      }
      else //kill event
      {

        oEvent.stopPropagation();
      }

    });
  });
}

}
It’s my pleasure to help you out, kind stranger.
And it would be much appreciated if you’d show some credit when you copy my stugg, and especially leave some encouraging comments.
I feel like shouting from the mountaintops into an empty void, but i see high numbers of visitors on this blog, so if you’re not a bot, why not leave a complex mathematical problem, a logical riddle, or just some constructive criticism?
Enjoy!
Or: Nuget Restore fails on docker build (that was my case, yay!)
Or: The command ‘cmd /S /C dotnet restore returned a non-zero code: 1 in Docker build
First of all, i found a temporary solution on Stackoverflow
Try this
docker network ls
This should list the networkIDs try running the docker build
docker build --network=<networkid> tag=<tag>
try the above with all the network listed it will work with one, that’s the host network.
(In my case, i used the ID of the NAT Network
Anyhow, temporary solutions are temporary, so i kept looking for something better.
And according to this article on CodeBucket the reason for this problem is that the docker DNS is broken, and it’s possible to set the DNS server in the docker configuration.
You’ll need to open /etc/docker/daemon.json on LINUX machines and alternatively open C:\ProgramData\docker\config\daemon.json on Windows machines.
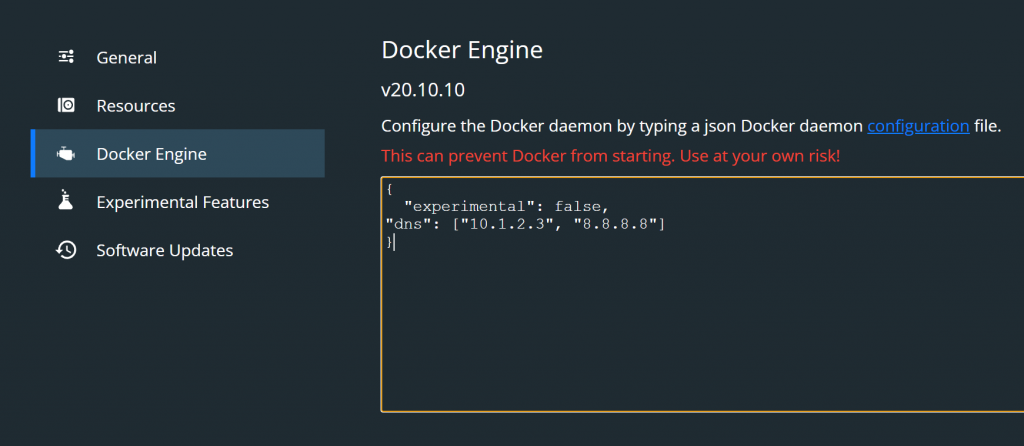
When using Docker for Windows, you can alternatively just use the Docker for Windows UI by right clicking on the Docker Icon in the Taskbar, opening settings and navigating to “Docker Engine”
Then you’ll need to hard-config your DNS Servers by adding this line into the JSON:
“dns”: [“10.1.2.3”, “8.8.8.8”]
A fresh install with this line added will look something like this
{
“experimental”: false,
“dns”: [“10.1.2.3”, “8.8.8.8”]
}
Et viola, the problem is fixed.
Next time your build should work “out of the box”
Or: How do i work in a modern, efficient and really really nice way?
The goal of this article is to set up a system where you will be running an angular web application in WSL2 and access it via a Browser on the Windows Host.
It’s pretty straightforward, because i prepared a little something.
Prepare following docker-compose.yml file (which you want to place somewhere on the same file-system level as your application, or above it, not below!)
services:
my-angular-app:
build:
image: cryptng/angular:node14ng13
volumes:
– ./my-angular-app:/app
ports:
– “4200:4200”
command: bash -c “npm install -f –loglevel verbose && ng serve –verbose — watch=true –host=0.0.0.0 –proxy-config proxy.config.json –disable-host-check”
volumes:
node_modules:
version: ‘3.5’
You WILL have to fix the indentation to match yml standards.
You might notice that we are using an existing image from the docker hub.
It’s actually a repository that i manage and maintain with a friend.
If you check it out in detail, you will notice that this images matches the latest
angular-web-development standards as per november of 2021 (nearing the end of the corona crisis, probably, maybe).
The image basically uses Node:14 as a base image, containing NPM and YARN, and installs Angular-CLI 13 and Angular-Core 13 on a local and global level, then exposes port 4200.
THIS IMAGE ASSUMES THAT THE DOCKER COMPOSE FILE IS ON THE SAME LEVEL AS THE APPLICATION DIRECTORY & THE APPLICATION DIRECTORY IS NAMED “MY-ANGULAR-APP”
Of course, you can easily modify the “ports” section of the compose file to change the port you want to serve to, the LEFT side is the host side.
That means that if you run this compose file with a valid application, you will be able to reach your application from a browser on the windows host via “http://localhost:4200”.
If you change the LEFT element from 4200 to 4201, the address will be “http://localhost:4201” independently from the actual EXPOSE command in the dockerfile providing the container.
bash -c “npm install -f –loglevel verbose && ng serve –verbose — watch=true –host=0.0.0.0 –proxy-config proxy.config.json –disable-host-check”
This command assumes you have a proxy.config.json in the application directory, remove the –proxy-config proxy.config.json part if you do not have a backend running on the windows host, else, create a proxy.config.json and configure it to lead to the windows host.
The npm command will install all dependencies whenever the docker-compose has been run.
Now, if you also want to be developing in visual studio code, install it in your WSL and run
“code path-to-your-app-directory/. “
it will open VS code in this directory, vs code will automagically understand that this is an angular application and will give you some prompts depending on its complexity and components.
If you now have a valid application in the “my-angular-app” directory, you can have fun and start developing.
Enjoy!
IMPORTANT:
I’m explaining this problem from an “ember” point of view, still, this solution fits multiple frameworks and is a general fix to get materialize parallax working – stay tuned!
If you know web frameworks, you know the dreaded word
DEPRECATED
from any log at any time, everywhere!
Some time ago i encountered a familiar error message while updating an ember project:
using this.$() in a component has been deprecated, consider using this.element
Ember 3.9 deprecation (2019)
[deprecation id: ember-views.curly-components.jquery-element]
To read a detailed description on the reason this deprecation was introduced and the details on upgrading on it, please click the link in the quotation, it’ll lead you to deprecations.emberjs.com
The actual reasoning behind this change is not relevant for the fix that i’m going to introduce.
Anyhow, this change affected the parallax background(s) on my webpage, it didn’t break anything, but it would surely introduce a problem on the long run, so i was going to update the deprecated line.
The line looked like this:
this.$(‘.parallax’).parallax();
The full deprecation warning looked like this:
deprecate.js:136
DEPRECATION:
Using this.$() in a component has been deprecated, consider using this.element [deprecation id: ember-views.curly-components.jquery-element]
See https://deprecations.emberjs.com/v3.x#toc_jquery-apis for more details.
I looked all around and found a solution on the original materialize documentation (and copies of this solution on the StackOverflow)
So i applied the “fix” and replaced my line with this:
 document.addEventListener('DOMContentLoaded', function() {
    var elems = document.querySelectorAll('.parallax');
    var instances = M.Parallax.init(elems, options);
  });
The above code implies that you somehow import “M” from materialize css, which would add this entry to the top of the page:
import M from ‘materialize.css’;
And you know what?
It didn’t work.
I didn’t get an error, and i didn’t get a parallax.
The page was just showing no background…
Next thing i did was contacting a good friend to ask him about his opinion.
He told me, first of all, that materialize.css does not have to be imported anymore on the latest versions of ember, it’s globally injected, automagically.
So ok, we throw out the import.
The code still doesn’t work.
He tells me that it’s not a good idea to add an eventListener like this in ember, unsure if this listener like this would actually be triggered , prefering that we use the ember native method “later” to execute the code at the end of the runloop, when the dom has been build.
So we import “later” and change the code, like following:
import { later } from ‘@ember/runloop’;
later(()=>{
var elems = document.querySelectorAll(‘.parallax’);
window.M.Parallax.init(elems, options);});
nope, still a white background, nothing parallaxy going on here.
So then, something caught our eyes..
what’s that “options” variable doing there?
Where does it come from?
It’s never been introduced, it’s undefined, and i assumed it would be passed on as undefined, not having an effect on further execution.
Some “stepping into” later, we notice that, since the options variable is undefined, the initialization code is never executed by materialize.
We change the code like following:
import { later } from ‘@ember/runloop’;
later(()=>{
var elems = document.querySelectorAll(‘.parallax’);
window.M.Parallax.init(elems);});
Passing no options, alternatively, you may pass an empty hash like so “{}” as second parameter.
Bam, fixed. Parallax’es going for you.
ENJOY!
When trying to install npm packages via “npm install”, you might encounter an error “EBADPLATFORM”
npm ERR! notsup Unsupported platform for fsevents@1.1.3: wanted
{"os":"darwin","arch":"any"}
This Error is indicating that you are installing the fsevents module in another OS rather than Mac, but the fsevents module only works for Mac OS.
If you did not purposefully include fsevents in your package.json, this hints at a sub-dependency.
To fix this error, you can use following parameters in the npm install command:
npm install -f --loglevel verbose The loglevel will help you debug any further problems. “-f” will force npm to fetch remote resources even if a local copy exists on disk.
I was unable to obtain information on how this fix actually corrects the sub-dependency issue, i could guess, but that doesn’t really help anyone.
If anyone has an explanation that’s more than just guessing, please feel free to leave a comment!
Or: “Setting a portproxy”, or: “i need an easy tool to manage my portproxies”
So, i’ve been developing a web app and wanted to use a second computer for debugging in chrome, mainly because i don’t have a second screen and i figured a tablet floating next to my display would suffice.
I broke a lot of network settings and enabled a lot of firewall rules trying to connect to a port on my host pc from the tablet, nothing worked and i really got frustrated.
A good friend of mine was kind enough to point me to “netsh interface portproxy” and the possibility to set portproxies in windows to forward connections from and to my apps.
Trying out a lot of combinations i cluttered my portproxies and had to figure out how to delete them one-by-one.
It turned out that it’s pretty easy to just set up a portproxy for the same external and internal port and the local network:
netsh interface portproxy add v4tov4 listenport=[YOUR-PORT] listenaddress=0.0.0.0 connectport=[YOUR-PORT] connectaddress=127.0.0.1
Now, i’m a pretty lazy person when it comes to tedious-typing tasks in the command-line and i really didn’t want to delete the 10 broken portproxies created while trying out different things with the netsh interface portproxy add command.
So i went ahead and wrote a small powershell script that helps me keep oversight of my setup and enables me to easily delete and create new portproxies.
It’s far from perfect, but it’s easy to use, reliable enough and you can upload it to github.
Write-Host THIS SCRIPT WILL ONLY WORK IF YOU RUN IT WITH ELEVATED PRIVILEGUES!
Write-Host List of set proxies:
Write-Host ####################
netsh interface portproxy show v4tov4
Write-Host ####################
$rord = Read-Host -Prompt 'Do you want to create a new proxy (1) or delete a proxy (2)'
if($rord -eq 1)
{
Write-Host [1] Create PortProxy
$local = Read-Host -Prompt 'Do you want to open a port to the local network? (listenaddr 0.0.0.0, connectaddr 127.0.0.1, same listen and connect port), type (yes)'
if($local -eq 'yes')
{
Write-Host [YES] Opening port to local network, set listenaddr = 0.0.0.0, connectaddr 127.0.0.1
$port = Read-Host -Prompt 'Please input the port that you want to open to the network'
netsh interface portproxy add v4tov4 listenport=$port listenaddress=0.0.0.0 connectport=$port connectaddress=127.0.0.1
Write-Host 'Done, press any key to exit'
pause
exit
}
Write-Host [NO] Opening port with full manual settings, you will need to enter the listen port, listen addr, connect port and connect addr.
$lport = Read-Host -Prompt 'Input port to listen to'
$laddr = Read-Host -Prompt 'Input address to listen to'
$cport = Read-Host -Prompt 'Input port to connect to'
$caddr = Read-Host -Prompt 'Input address to connect to'
netsh interface portproxy add v4tov4 listenport=$lport listenaddress=$laddr connectport=$cport connectaddress=$caddr
Write-Host 'Done, press any key to exit'
pause
exit
}
if($rord -eq 2)
{
Write-Host To delete a portproxy, you will need to enter the listen port and listen address
$lp = Read-Host -Prompt 'Enter the port of the proxy you want to delete, you will enter the listenaddress in the next step'
$la = Read-Host -Prompt 'Enter the listenaddress of the proxy you want to delete'
netsh interface portproxy delete v4tov4 listenport=$lp listenaddr=$la
}
Write-Host Done
 pause
 exit
You’ll probably have to create a loop outside the script if you want to do more than one thing per session, this was enough for my use-case and i left it be.
Alternatively, i found “PortProxyGUI” from “zmjack” on github. It’s nice!
Edit:
Trouble running the script because execution of powershell scripts is disabled on your system?
Enjoy and have fun!
Or: “WSL2 Docker is not connecting to my Host!!!! HELP!”
In another post i already talked about a setup to get both Windows Host / Windows Host Docker and WSL Docker talking to each other.
The setup broke at some point and i figured out a pretty automated solution for this… for now, let’s hope it works after the next WSL or Docker update.
My solution was following Setup:
1- Start Docker in WSL automatically on BOOT
2- Wait a minute after Logon and start Docker Desktop (this post)
Prerequisites:
– Docker Desktop WSL Integration is turned off.
– Docker on WSL has been detached from Docker Desktop for the Windows Host
– Docker Desktop Autostart is disabled
Now, assuming you followed part 1.
Let’s continue and create a file and paste this powershell script provided by StackOverflow User StingyJack (Thanks m8!).
In my case, the file is running in “C:/Sources/Scripts_Autostart” and is called “docker-restart.ps1”.
Write-Output "$((Get-Date).ToString("HH:mm:ss")) - Restarting docker"

foreach($svc in (Get-Service | Where-Object {$_.name -ilike "*docker*" -and $_.Status -ieq "Running"}))
{
    $svc | Stop-Service -ErrorAction Continue -Confirm:$false -Force
    $svc.WaitForStatus('Stopped','00:00:20')
}

Get-Process | Where-Object {$_.Name -ilike "*docker*"} | Stop-Process -ErrorAction Continue -Confirm:$false -Force

foreach($svc in (Get-Service | Where-Object {$_.name -ilike "*docker*" -and $_.Status -ieq "Stopped"} ))
{
    $svc | Start-Service
    $svc.WaitForStatus('Running','00:00:20')
}

Write-Output "$((Get-Date).ToString("HH:mm:ss")) - Starting Docker Desktop"
& "C:\Program Files\Docker\Docker\Docker Desktop.exe"
$startTimeout = [DateTime]::Now.AddSeconds(90)
$timeoutHit = $true
while ((Get-Date) -le $startTimeout)
{

    Start-Sleep -Seconds 10
    $ErrorActionPreference = 'Continue'
    try
    {
        $info = (docker info)
        Write-Verbose "$((Get-Date).ToString("HH:mm:ss")) - `tDocker info executed. Is Error?: $($info -ilike "*error*"). Result was: $info"

        if ($info -ilike "*error*")
        {
            Write-Verbose "$((Get-Date).ToString("HH:mm:ss")) - `tDocker info had an error. throwing..."
            throw "Error running info command $info"
        }
        $timeoutHit = $false
        break
    }
    catch
    {

        if (($_ -ilike "*error during connect*") -or ($_ -ilike "*errors pretty printing info*")  -or ($_ -ilike "*Error running info command*"))
        {
            Write-Output "$((Get-Date).ToString("HH:mm:ss")) -`t Docker Desktop startup not yet completed, waiting and checking again"
        }
        else
        {
            Write-Output "Unexpected Error: `n $_"
            return
        }
    }
    $ErrorActionPreference = 'Stop'
}
if ($timeoutHit -eq $true)
{
    throw "Timeout hit waiting for docker to startup"
}

Write-Output "$((Get-Date).ToString("HH:mm:ss")) - Docker restarted"
Next up: Open Task Scheduler and create a new Basic Task
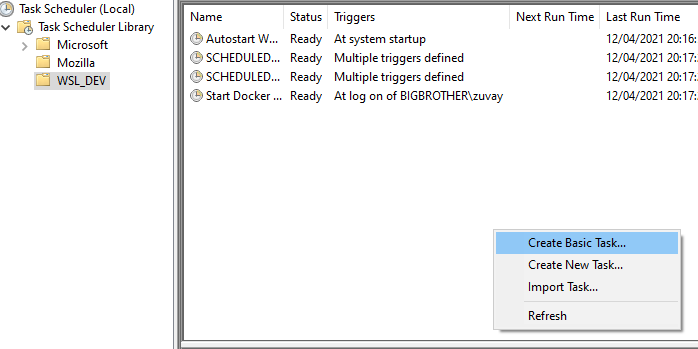
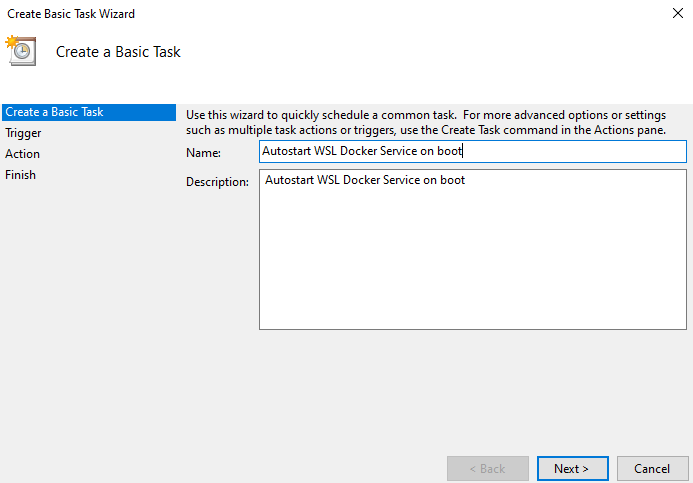
Name it like you want, i chose “Start Docker Desktop after WSL Docker”.
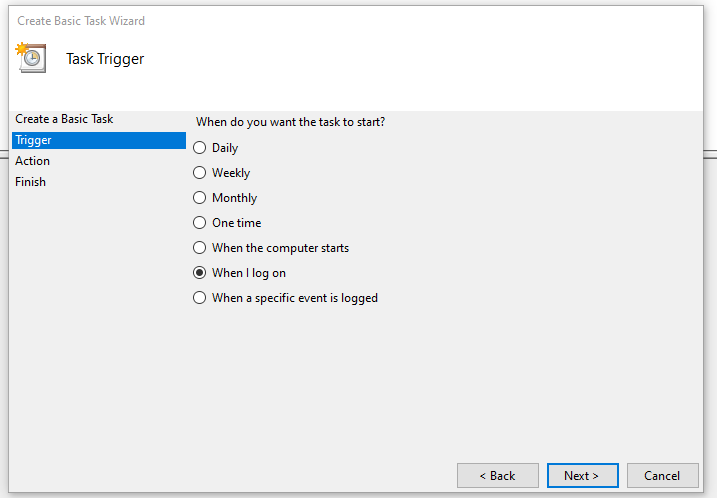
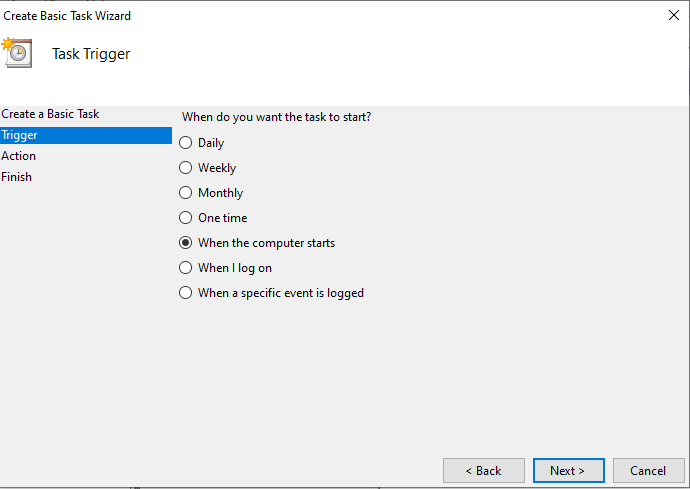
Next, then select “When i log on”
Next: set “Program/Script” to Powershell
Then set argument to
-windowstyle hidden -ExecutionPolicy Bypass -file C:\Sources\Scripts_Autorun\docker-restart.ps1
Of course you will choose the folder where you put the script.
don’t forget to add quotations if your path contains spaces!
Click next and after finishing the setup open the Task back up again. (Edit properties)
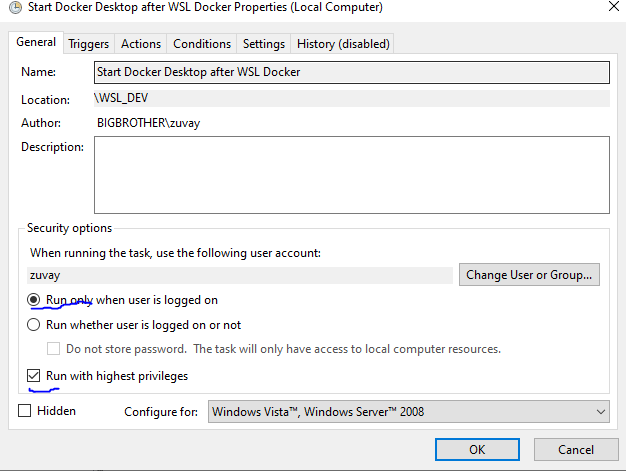
In the General Tab set “Run only when user is logged on” and “Run on highest privilegues”
Open the Trigger in the “Triggers” tab and set a Delay for 1 minute.
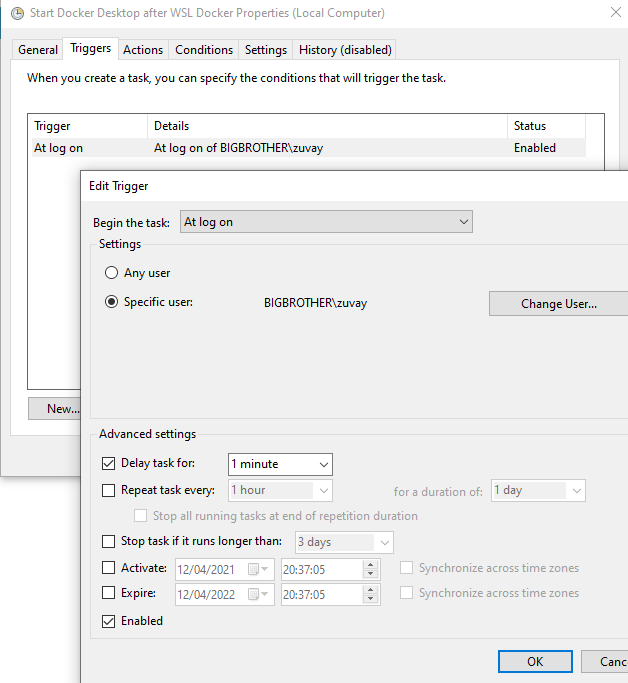
That’s it!
Have, of course you will have to chill about a minute or two after rebooting your pc.
If you’re faster than your scripts, this won’t work.
You might also want to adjust the delay time for the script for part 1. and 2.
Or Fix ” Script_XYZ cannot be loaded because
running scripts is disabled on this system. For more information, see about_Execution_Policies at
https:/go.microsoft.com/fwlink/?LinkID=135170.”
Easy fix, open up an administrative powershell and enter
Set-ExecutionPolicy unrestrictedWarning:
It is out of the question that this makes your computer vulnerable for attacks via PS scripts.
Use at your own risk, know what you are doing.
If you do not want to accept the security risks of enabling scripts system-wide, you might want to check out this single-case solution which you can use to bypass restricted execution for single powershell scripts
(from an elevated powershell)
powershell.exe -noprofile -executionpolicy bypass -file .\yourScript.ps1Enjoy!
Or: “I don’t want to manually startup everything in WSL after every boot”
For me, that’s docker.
My docker is running independantly of docker desktop on the host so i want it to startup when the PC is booted.
Following easy steps to set it up in Task Scheduler:
- Open up Task Scheduler
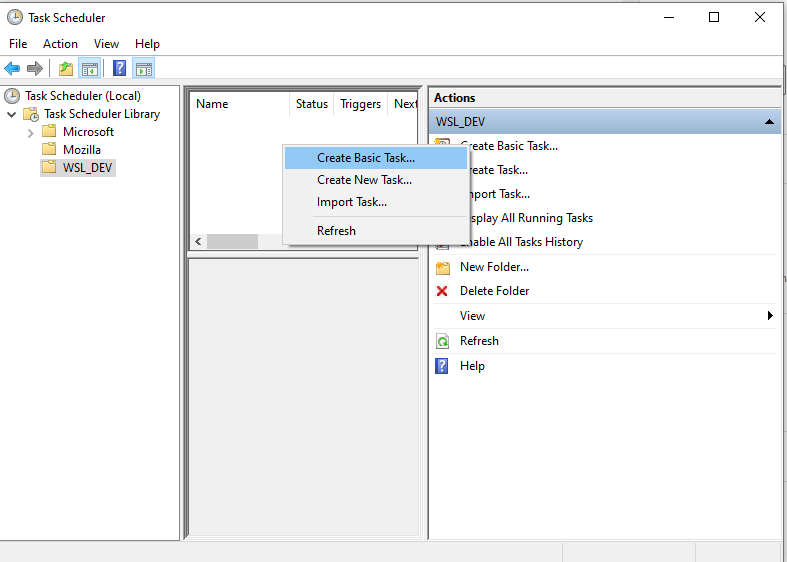
- Create new Basic Task
- Name it like you will, mine was “Autostart of WSL Docker service on boot”
- Next, then choose “When the Computer Starts”
- Next, then “Start a program”
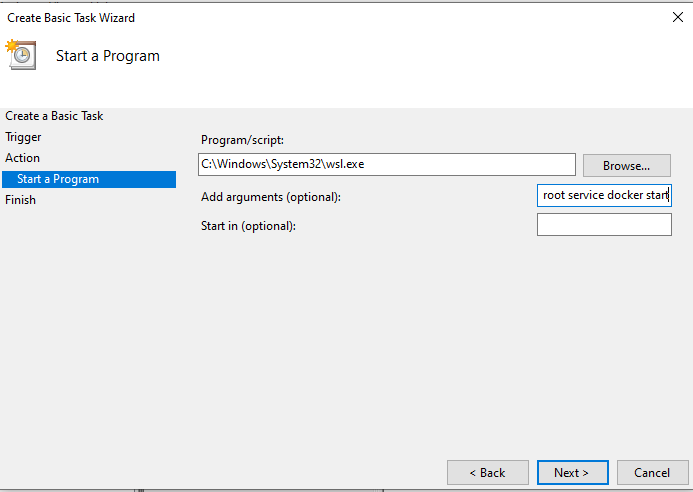
- In “Program/script” find WSL.exe, it should be located like so:
“C:/Windows/System32/wsl.exe” - In “Add arguments (optional)” enter following:
-d Ubuntu-20.04 -u root service docker start - Finish the setup via “Next” then “Finish”.
- Run it to test it.
Instead of “Ubuntu-20.04” you might want to find your correct distro name by entering
“wsl –list” into a commandline on windows, you’ll need to use the same distro name displayed for the distro of your choosing.
Edit:
if this doesn’t immediately work for you, you might want to open up the task in task-scheduler, navigate to “triggers”, open the trigger and set “Delay Task for” to 30 seconds or any amount that makes sense for your system start-up time.
That’s it.
Enjoy.
Many thanks to StackOverflow user octagon_octopus
Or: “Get Docker running in WSL without WSL Integration”
Recently, i’ve had a special case where i had to develop a project with Docker containers running on the Windows Host Docker, other containers running in WSL and some of the tools running directly on the Windows Host.
(Basically, a big confusing mess).
To get this 3-way-communication going, i actually had to install Docker in WSL independantly from Docker Desktop on my Host.
This turned out to be a little tricky, just because i didn’t really know where to look up the sources.
So if anyone of you have these special needs, feel free to follow me along.
Take these steps:
- Install Docker Desktop normally on your host, do not enable WSL Integration but install all tools necessary for WSL Integration (just in case)
- Open up your WSL and execute following commands:
sudo apt-get update
 sudo apt-get install \
    apt-transport-https \
    ca-certificates \
    curl \
    gnupg \
    lsb-release
Get the Docker GPG Key
curl -fsSL https://download.docker.com/linux/ubuntu/gpg | sudo gpg --dearmor -o /usr/share/keyrings/docker-archive-keyring.gpgSet up stable repository:
 echo \
  "deb [arch=amd64 signed-by=/usr/share/keyrings/docker-archive-keyring.gpg] https://download.docker.com/linux/ubuntu \
  $(lsb_release -cs) stable" | sudo tee /etc/apt/sources.list.d/docker.list > /dev/null
Do another update
sudo apt-get updateInstall docker engine independantly of host:
sudo apt-get install docker-ce docker-ce-cli containerd.ioAfter this, i restart my WSL instance (Close and open up again) and run
sudo service docker startAnd check if docker is running correctly:
sudo docker run hello-worldThis is basically copied and condensed from
https://docs.docker.com/engine/install/ubuntu/ [12th of April 2021]
As i don’t know if the site content ever changes i wanted to have a copy of the steps myself.
Now you have docker only in wsl, you will have to start up the service manually if you open up your WSL instance for the first time or if WSL is stopped completely.
But i’ll offer a fix for that later.
This will also work without Docker installed on the host, so both instances don’t know about each other and Docker Desktop cannot f* with your network too much.
Recent Comments