a pleasant descent into madness

Month: March 2021

WSL2 fix clockskew

(For people who like to hibernate/sleep rather than reboot.)

So after keeping you machine running for some days, weeks, or in unlikely cases maybe months without a reboot, you might notice that wsl has trouble retrieving packages from the web and maybe even other strange problems.

This might be related to “clock skew”, an issue where the clock in WSL (2) desynchronizes with the host clock.

There’s an easy fix which sadly requires you to run a sudo-ed script in wsl on startup.

So, let’s start by disabling the sudo password

And now we should open a new WSL 2 instance, this should locate us in our userprofile directory (user home).

Run following command

sudo nano .bashrc

Then add following line to the end of the file

sudo ntpdate ntp.ubuntu.com &>/dev/null

now press CTRL + O and exit the script

After the next WSL instance start, you should not have a clockskew problem anymore.

[DEPRECATED] Automatically start docker service in WSL2

DEPRECATED, look at Start WSL 2 Service on Host startup instead.

I keep forgetting to start the docker service when opening up an instance of WSL(2)

Let’s fix that!

So what do we want to do?
We want to run the docker service from startup!
And that has to be done on sudo… but we don’t want to be reminded of that constantly
(in the form of a prompt to enter the sudo password on every WSL2 instance start).

First of all, sadly, we need to stop WSL from asking us for the sudo password.

Stop WSL2 from asking for sudo password

Next up, open up wsl and run

sudo service docker start > /dev/null 2>&1 &

This starts the service in the background while piping the output to null

As you opened a new WSL instance, this should be happening within your userprofile and opening up the .bashrc file.

Add following line to the end of the file:

sudo service docker start

Now WSL instance startup may take some seconds depending on how long it will take to start up docker in WSL.
Have fun!

Stop WSL2 from asking for sudo password

WSL2 normally is being used during development, ideally by a person that actually know what they’re doing, these people – and developers – sometimes have to run scripts on wsl startup or keep having to start services manually running sudo.

This can be time consuming or even hinderance at worst.
To circumvent this issue, you can stop WSL from asking you for the sudo password.

I know that this is not the best possible thing you can do security-wise, but i’ve been looking for a lot of possible ways to work around auto-sudoing and could not come up with a satisfactory solution, especially if you are the type that keeps hibernating the PC instead of rebooting (like me) so WSL never actually has to restart at all.

This imposes a security risk and enables scripts running on user-level to be executed with higher privilegues, please only do this if you actually know what you are doing.
Personally, as WSL is a development environment, i find the list pretty low, but that also depends on what kind of packages you download and what kind of data you handle on your machine, especially because WSL enables access to the windows file system!

Anyway, straight to the point:
To stop WSL from asking you for the SUDO password, open up a WSL (2) Shell and type

sudo visudo

And add the following line to the end of the file

YourUsername ALL=(ALL) NOPASSWD: ALL

Of course you will want to type in your username instead of “YourUsername”.
Then press Ctrl + O and exit the window.
After the next WSL startup you should be all set-up.

Powershell and JSON is madness, kinda

or “Fix CreationDate for GOOGLE Takeout Photos”

(or “a favor for a friend that turned ballistic”)

Today i saw a message on my phone, a good friend of mine had lost the photos that were locally stored on his phone.
Luckily, he had a backup on google photos, he decided to grab a backup of his google cloud storage via Google Takeout and create another local backup.

That’s where things got interesting,
it turned out that Google Takeout (or maybe even Google Photos itself?) actually strips all photos of their EXIF data and creates a “imagename.json” json file instead, storing the json next to the actual image.
And most interestingly the Takeout generated Json information was warped in regards to the original Exif data, containing information like “photoTakenTime” and “creationDate” which are not the same value.

This poses an interesting problem, you might want to be able to search through, sort and otherwise work with the image metadata of the takeout, for example, i’m somebody who likes to statistically analyze some aspects of my google behavior locally with my own self-made tools.

So my friend asked me if i could provide a script that fixes the creationDate of the pictures on the windows filesystem by using the json files,

After a little prototyping, i noticed that the problem actually touches a lot of issues that you can get into when using powershell, so i wanted to share my findings and result with you.

First up, i used the Powershell ISE, the ISE is actually a helpful scripting tool for Powershell itself, but is missing some features and intuitivity that i would expect.
For example, errors seem ambiguous, if you declare a variable and powershell fails to set a value, it will not acknowledge the variable as such and instead use it as a string value without hinting at all at what might have gone wrong.

Now, let me show you what the JSON looks like:

{
"title": "01.jpg",
"description": "",
"imageViews": "0",
"creationTime": {
"timestamp": "1541396665",
"formatted": "05.11.2018, 05:44:25 UTC"
},
"photoTakenTime": {
"timestamp": "1487671512",
"formatted": "21.02.2017, 10:05:12 UTC"
},
(… it continues here but we are not interested in that part)

“photoTakenTime.formatted” contains the value we need.

Starting on the script, my assumption is that image files can have different file types and that the source folder will only contain images and jsons, maybe the script (ps1) itself.
Also Takeout “handily” (?) names the Jsons like so:
myimage.jpg, myimage.jpg.json
Easy peasy! Let’s assign all files in the current working-directory (from which i assume the script will be executed)

$files = Get-ChildItem $pwd -Recurse -Exclude .json,.ps1
if you want to be sure it worked, add another line
Write-Host $files

The interesting part here is that
$pwd retrieves the current workingdirectory and
-Exclude defines what extensions should be ignored, i only want the images, so i exclude json, these values are not strings!

Next up, i’m gong through all the files and creating variables for easy access to the file and the corresponding json file

foreach ($f in $files) {

$fileFullName = $f.FullName $fileJsonName = $f.FullName + ".json"

The following line is commented out, i noticed that this line will retrieve a Json File “Object” in powershell, the parameter “-Depth 3” defines the depth with with the json will be analyzed, a depth of 1 would leave nested elements out.
It turned out that this approach is more complicated, so the line was removed, but the code is still interesting if you want to work with a Json-ified object in powershell and it took me some time to paste together the sequence.

#$fileJsonContent = Get-Content -Raw -Path $fileJsonName | Out-String | ConvertTo-Json -Depth 3 | ConvertFrom-Json

The next line retrieves all of the Json Content, -Raw enables us to load all the nested elements, this generates a Powershell Objects containing the actual properties of the Json
So the object “fileJson” has the property “photoTakenTime” which you could access via “fileJson.photoTakenTime”

$fileJson = Get-Content -Raw -Path $fileJsonName | ConvertFrom-Json

Now the nice part, it’s possible to tell Powershell to retrieve sub-elements of another Powershell object, here the Object has a property photoTakenTime, but it is empty, the expand flag enables us to open up its content and do another select inside of it to get the actual value.
$fileJsonPhotoTakenTime = $fileJson | Select -expand photoTakenTime | Select formatted

The output of the previous command is
"formatted":"21.02.2017, 10:05:12 UTC"
This is, as stated, a Powershell Object which you can access with its properties, in this case, formatted.
We extract the value "21.02.2017, 10:05:12 UTC" by accessing $fileJsonPhotoTakenTime.formatted

Write-Host 'Photo Taken:' $fileJsonPhotoTakenTime.formatted

The timestamp contains “UTC” at the end, Get-Date cannot recognize this value, so we have to remove it.
This results in following string:
"21.02.2017, 10:05:12

$readabletimestamp = $fileJsonPhotoTakenTime.formatted.Replace("UTC","")

Now to set the actual file property, we access the image files “CreationTime” property and set the date from the readable string.

$(Get-Item $fileFullName).CreationTime=$(Get-Date $readabletimestamp)

Write-Host $fileFullName set to CREATION DATE $readabletimestamp

}

Perfect, this will create following beautiful script!

$files = Get-ChildItem $pwd -Recurse -Exclude .json,.ps1
Write-Host $files
foreach ($f in $files) {
$fileFullName = $f.FullName
$fileJsonName = $f.FullName + ".json"
Write-Host $fileFullName
$fileJson = Get-Content -Raw -Path $fileJsonName | ConvertFrom-Json
$fileJsonPhotoTakenTime = $fileJson | Select -expand photoTakenTime | Select formatted
Write-Host 'Photo Taken:' $fileJsonPhotoTakenTime.formatted
$readabletimestamp = $fileJsonPhotoTakenTime.formatted.Replace("UTC","")
$(Get-Item $fileFullName).CreationTime=$(Get-Date $readabletimestamp)
Write-Host $fileFullName set to CREATION DATE $readabletimestamp
}

Either run it by using the ISE and navigating to your folder, change it or put it into the destination folder and enable powershell-scripts running on your system before you run it.

NOTE:
If you opened your file explorer to see the change, or you opened an image property window, close the window and refresh the explorer before opening it.
If you did not refresh the explorer, the file will not “know” that it changed, that’s due to the strange implementation in windows, not my fault 😉

Thanks for your time and as always, i’m happy for constructive criticism and support!

Sticky!

this blog is a side-project!
i do not view this blog or my website as a representation of the quality of my work.

customers require 110% of my time and efforts,
since i still want to be helpful for my fellow programmer colleagues and potential competitors, i’m dedicating some of the little free time i have into the actual content of the blog and not styling/theming or images that i’m drawing.

Talking from (Docker) WSL to (Docker on) the Windows Host

(Also works without Docker)

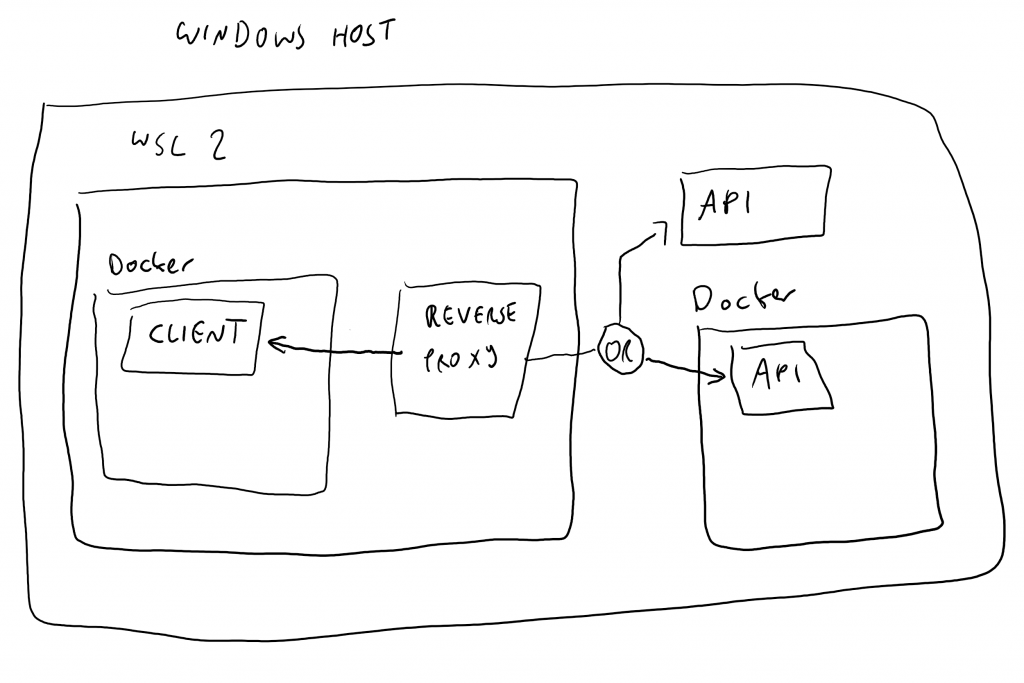
While working on a project employing a Client in WSL 2 (Windows Subsystem for Linux) and a Web-Api running on the Windows Host i noticed that there are several complex issues to resolve to get the communication going.
The main issue was that the connection between these two instances was hard to establish and needed lots of maintenance after each reboot or network reconnect of the machine which the ecosystem was running on.

My Setup:

I’m running a Javascript client framework on WSL2 Docker and a ASP .Net 5 REST Server directly on the Windows (during dev), but the Server might be moved to a docker container on a windows host later.

It’s hard to set up a connection between WSL2 Docker and Windows Host/Windows Host Docker, a solution is to employ a Reverse proxy on the Client in WSL2 Docker and prompt the Windows Host Server to listen to the WSL Adapter IP Address.

Figure: Talking from WSL 2 to Windows Host or Windows Host Container using Rev. Proxy

TALK FROM LINUX

(SUBSYSTEM FOR WINDOWS)

The first task is to set up the WSL Adapter IP Address for your reverse proxy client-side in wsl.

Run a WSL2 Terminal, from your current (home/default) directory, run
sudo nano .bashrc

Scroll completely down and add these lines:

#Manually added for setting ENV Variable WSL_WINDOWS_HOST
export WSL_WINDOWS_HOST=cat /etc/resolv.conf | grep nameserver | cut -d ' ' -f 2

Now, when you run your docker container in WSL, pass the environment variable WSL_WINDOWS_HOST

for example using this parameter (or a docker compose):
-e APIHOST=$WSL_WINDOWS_HOST

Inside the container, you just have to configure the proxy to use

http://$APIHOST:[YOURPORT] (or https of course)

Well, that’s done, now the WSL Container wants to talk to Windows, but nobody is listening, story of my life, let’s fix that up.

LISTEN FROM WINDOWS

The second task to get this running was to notify the Application about the WSL Adapter IP Address.
If you want to see the WSL Adapter IP Address just type “ipconfig” in powershell and find the WSL Adapter IPv4 Address.

You would want to inform your Server Application on the WSL Adapter IP Address, it needs to listen to this to receive connections from WSL.

To employ this IPv4 Address (make the Server listen to it) you want to change your launchSettings.json to listen to “http://[YOUR WSL ADAPTER IP ADDRESS]:[YOUR PORT]”


BUT:
The WSL Adapter IP Address changes on every Windows Host reconnect to any network and consequently on every reboot and/or occasionally on wake-ups of the Host system (from Sleep or Hibernate).
Normally, the IP-Address to listen to has to be configured in your (server) application, that means that you have to set it before the server application starts.
If the IP constantly changes, it can be time consuming to look up the WSL Adapter IP Address every time and change the server settings accordingly.

Well that’s where Task Scheduler and Powershell play together, you will want to create a powershell script that reads the WSL Adapter IP Address and stores it in an environment variable, this environment variable can then be used by your server application.

Luckily, i took the time to figure out the Powershell and corresponding Task Scheduler settings:

This is the powershell script, here called “wsl_adapter_ip_to_env.ps1” and located in “C:/Sources/Scripts_Autorun” on the Windows host:

$ip = (Get-NetAdapter -Name WSL | Get-NetIPAddress).IPv4Address
setx WSL_ADAPTER_IP $ip

Create this file and open up the Task scheduler (Windows Key + R, then “taskschd.msc”)

Create a folder in the Task Scheduler Library (for better Script management), i created
“Task Scheduler Library/WSL_DEV”

Create a new Task (NOT a Basic Task) with following Settings:
GENERAL TAB:
> Description: “Create ENV Variable WSL_ADAPTER_IP with WSL ADAPTER IP Address”
> Security Options: Run only when user is logged in (your user)
> Security Options: Run with highest privilegues

TRIGGERS TAB:
> NEW TRIGGER: At logon (your user), Delay: 1 minute, enabled
(this will update the WSL Adapter IP variable on logon)
> NEW TRIGGER: On an event (basic), Log: Microsoft-Windows-NetWorkProfile/Operational, Source: NetworkProfile, Event ID: 10000, Enabled
(this will update the WSL Adapter IP on every Windows Host Network reconnect, no matter which adapter or network type)

ACTIONS TAB:
> NEW ACTION, START A PROGRAM
Program/Script: powershell
Add Arguments: -windowstyle hidden -ExecutionPolicy Bypass -file C:\Sources\Scripts_Autorun\wsl_adapter_ip_to_env.ps1

That’s it, now you will have an updated WSL Adapter IP Address Environment variable every time it changes.

There are multiple approaches to use this environment variable in a .Net API, currently i’m doing this in “Program.cs”

      public static IHostBuilder CreateHostBuilder(string[] args)
{
string wslAdapterIp = Environment.GetEnvironmentVariable("WSL_ADAPTER_IP");

return  Host.CreateDefaultBuilder(args)
            .ConfigureWebHostDefaults(webBuilder =>
            {
                webBuilder.UseStartup<Startup>();
                if (!String.IsNullOrEmpty(wslAdapterIp))
                {
                    Console.WriteLine("WSL_ADAPTER_IP Environment variable is set, using.");
                    webBuilder.UseUrls($"http://{wslAdapterIp}:5000","https://{wslAdapterIp}:5001");
                }
            });
    }

Note that you will need to pass this environment variable into the container via the “-e” flag or a docker-compose file, this example will work directly on the host using the env var that has been set by the task scheduler.

Well then, happy coding, leave a like, comment or whatever, until next time and don’t forget to bash in the bell icon and call the foo fighters.
Bye!


(As usual, i’m open for constructive criticism, fixes and anything else that you might want to contribute)

Important Finding!

If WSL-Integration is active in Docker Desktop, none of this will work.
Disable WSL-Integration under Docker-Desktop Settings -> General

This also implies that you install docker on your WSL (2) the same way as you would on a seperate machine.


Another important finding!

This setup worked for me for a few weeks, then suddenly stopped working.

I put some hours of figuring-out into it and noticed another problem:

It seems that the network settings are scrambled/broken when Docker Desktop starts before WSL2 – Docker.

That means that if Docker Desktop is started on Windows Startup as usual, WSL Docker will be unable to talk to the Windows Host.

To fix this very strange behavior (please somebody take the time to explain this to me?) i have 2 workarounds:

  1. Disable Docker Desktop autostart and run only after WSL 2 Docker has been started.
  2. A sophisticated solution using Task-Scheduler, good timing and powershell scripts.


IMPORTANT FOOTNOTES

Please note that the bashrc script on WSL will only run if WSL is starting, this means that if the WSL Adapter IP Changes during runtime, you need to restart WSL by closing all Windows and opening a new one or by rebooting the machine if you prefer.

Please note that Windows works in strange ways, for example, if you open a command line window or start a process, on start, the process will load all environment variables and not update them (ever, again), this means that if you are running Visual Studio or a Command Line and your Adapter IP Environment variable changes, you might want to restart Visual Studio or the Command window.

These behaviors cannot be influenced by me and are operating system dependant quirks, i’m already looking into some kind of force-reload mechanisms, but other than working with temporary files (which is NOT a good way) i could not yet come up with a solution for VS or WSL (though i found a force-reload for cmd/ps).

Adding jars to the classpath of a java docker container

It is easy to add a jar file to the java classpath by using the command
java -cp path/to/jar myjar.jar

The problem with this approach is that the “-cp” or “-classpath” command will overwrite your default classpath, meaning that you will loose all of the other references that existed in there before, you only have the jars that you reference within the classpath command parameter.

In my case, i wanted to APPEND multiple jars during container startup so they can be referenced by my products plug-ins, so i had to figure out how to open up my jar to enable this , after that, it was very easy to append jars.
In the extracted jar directory structure, you will find that you have a “BOOT-INF\lib” directory.

Any of the lib directories contents are automatically added to the classpath when the program is run.

So we want to create another directory inside the lib directory called “external_lib”

“BOOT-INF\lib\external_lib”.

This folder can now be mounted in a docker compose or run command, the folder in the host filesystem can contain any additional jar files that you want to append to the classpath.

Example compose:

mycontainer:
image: mybaseimage:1.0
volumes:
- .\host\tomount\lib:C:\app\BOOT-INF\lib\external_lib

Attention:

Mounting BOOT-INF\classes\lib will not work!

Running a java program in a docker container

Aka: don’t pack fat jars into your container

This post assumes you are using JDK 15

To run a java program from an image, you still need to provide the fat jar in the container.
You then want to extract the fat jar (jar -extract or unzip) into a separate folder.
You should now have a “BOOT-INF” “META-INF” and maybe other folders depending on your codebase.


Skip extracting the namespace if you already know the exact namespace of your main class.

Find the textfile “MANIFEST.MS” in META-INF and open it up, check to find the “MainClass” definition at the end of the file, keep this value in mind.
If your java project uses the spring boot framework (at least at the 2.x versions) you have to substitute the main class found in the MANIFEST.MS with
org.springframework.boot.loader.PropertiesLauncher

This is because the spring framework uses its own means and structure to pack jar files and bootstraps them with their propertieslauncher.

Now the only step left to do is to call the entrypoint correctly.
ENTRYPOINT java namespace.to.my.mainclass

An example for a correctly build dockerfile calling such a jar looks like so:

FROM adoptopenjdk15_hotspot as builder
WORKDIR /extracted_jar
COPY hostDir/myjar.jar ./
RUN jar -xf myjar.jar
ENTRYPOINT java my.main.class

© 2024 Yavuz-Support Blog

Theme by Anders NorenUp ↑