Or: How do i work in a modern, efficient and really really nice way?
The goal of this article is to set up a system where you will be running an angular web application in WSL2 and access it via a Browser on the Windows Host. It’s pretty straightforward, because i prepared a little something.
Prepare following docker-compose.yml file (which you want to place somewhere on the same file-system level as your application, or above it, not below!)
You WILL have to fix the indentation to match yml standards.
You might notice that we are using an existing image from the docker hub. It’s actually a repository that i manage and maintain with a friend. If you check it out in detail, you will notice that this images matches the latest angular-web-development standards as per november of 2021 (nearing the end of the corona crisis, probably, maybe).
The image basically uses Node:14 as a base image, containing NPM and YARN, and installs Angular-CLI 13 and Angular-Core 13 on a local and global level, then exposes port 4200.
THIS IMAGE ASSUMES THAT THE DOCKER COMPOSE FILE IS ON THE SAME LEVEL AS THE APPLICATION DIRECTORY & THE APPLICATION DIRECTORY IS NAMED “MY-ANGULAR-APP”
Of course, you can easily modify the “ports” section of the compose file to change the port you want to serve to, the LEFT side is the host side.
That means that if you run this compose file with a valid application, you will be able to reach your application from a browser on the windows host via “http://localhost:4200”. If you change the LEFT element from 4200 to 4201, the address will be “http://localhost:4201” independently from the actual EXPOSE command in the dockerfile providing the container.
This command assumes you have a proxy.config.json in the application directory, remove the –proxy-config proxy.config.json part if you do not have a backend running on the windows host, else, create a proxy.config.json and configure it to lead to the windows host.
The npm command will install all dependencies whenever the docker-compose has been run.
Now, if you also want to be developing in visual studio code, install it in your WSL and run “code path-to-your-app-directory/. “ it will open VS code in this directory, vs code will automagically understand that this is an angular application and will give you some prompts depending on its complexity and components.
If you now have a valid application in the “my-angular-app” directory, you can have fun and start developing.
Or: “Setting a portproxy”, or: “i need an easy tool to manage my portproxies”
So, i’ve been developing a web app and wanted to use a second computer for debugging in chrome, mainly because i don’t have a second screen and i figured a tablet floating next to my display would suffice.
I broke a lot of network settings and enabled a lot of firewall rules trying to connect to a port on my host pc from the tablet, nothing worked and i really got frustrated.
A good friend of mine was kind enough to point me to “netsh interface portproxy” and the possibility to set portproxies in windows to forward connections from and to my apps.
Trying out a lot of combinations i cluttered my portproxies and had to figure out how to delete them one-by-one.
It turned out that it’s pretty easy to just set up a portproxy for the same external and internal port and the local network:
Now, i’m a pretty lazy person when it comes to tedious-typing tasks in the command-line and i really didn’t want to delete the 10 broken portproxies created while trying out different things with the netsh interface portproxy add command.
So i went ahead and wrote a small powershell script that helps me keep oversight of my setup and enables me to easily delete and create new portproxies. It’s far from perfect, but it’s easy to use, reliable enough and you can upload it to github.
Write-Host THIS SCRIPT WILL ONLY WORK IF YOU RUN IT WITH ELEVATED PRIVILEGUES!
Write-Host List of set proxies:
Write-Host ####################
netsh interface portproxy show v4tov4
Write-Host ####################
$rord = Read-Host -Prompt 'Do you want to create a new proxy (1) or delete a proxy (2)'
if($rord -eq 1)
{
Write-Host [1] Create PortProxy
$local = Read-Host -Prompt 'Do you want to open a port to the local network? (listenaddr 0.0.0.0, connectaddr 127.0.0.1, same listen and connect port), type (yes)'
if($local -eq 'yes')
{
Write-Host [YES] Opening port to local network, set listenaddr = 0.0.0.0, connectaddr 127.0.0.1
$port = Read-Host -Prompt 'Please input the port that you want to open to the network'
netsh interface portproxy add v4tov4 listenport=$port listenaddress=0.0.0.0 connectport=$port connectaddress=127.0.0.1
Write-Host 'Done, press any key to exit'
pause
exit
}
Write-Host [NO] Opening port with full manual settings, you will need to enter the listen port, listen addr, connect port and connect addr.
$lport = Read-Host -Prompt 'Input port to listen to'
$laddr = Read-Host -Prompt 'Input address to listen to'
$cport = Read-Host -Prompt 'Input port to connect to'
$caddr = Read-Host -Prompt 'Input address to connect to'
netsh interface portproxy add v4tov4 listenport=$lport listenaddress=$laddr connectport=$cport connectaddress=$caddr
Write-Host 'Done, press any key to exit'
pause
exit
}
if($rord -eq 2)
{
Write-Host To delete a portproxy, you will need to enter the listen port and listen address
$lp = Read-Host -Prompt 'Enter the port of the proxy you want to delete, you will enter the listenaddress in the next step'
$la = Read-Host -Prompt 'Enter the listenaddress of the proxy you want to delete'
netsh interface portproxy delete v4tov4 listenport=$lp listenaddr=$la
}
Write-Host Done
 pause
 exit
You’ll probably have to create a loop outside the script if you want to do more than one thing per session, this was enough for my use-case and i left it be.
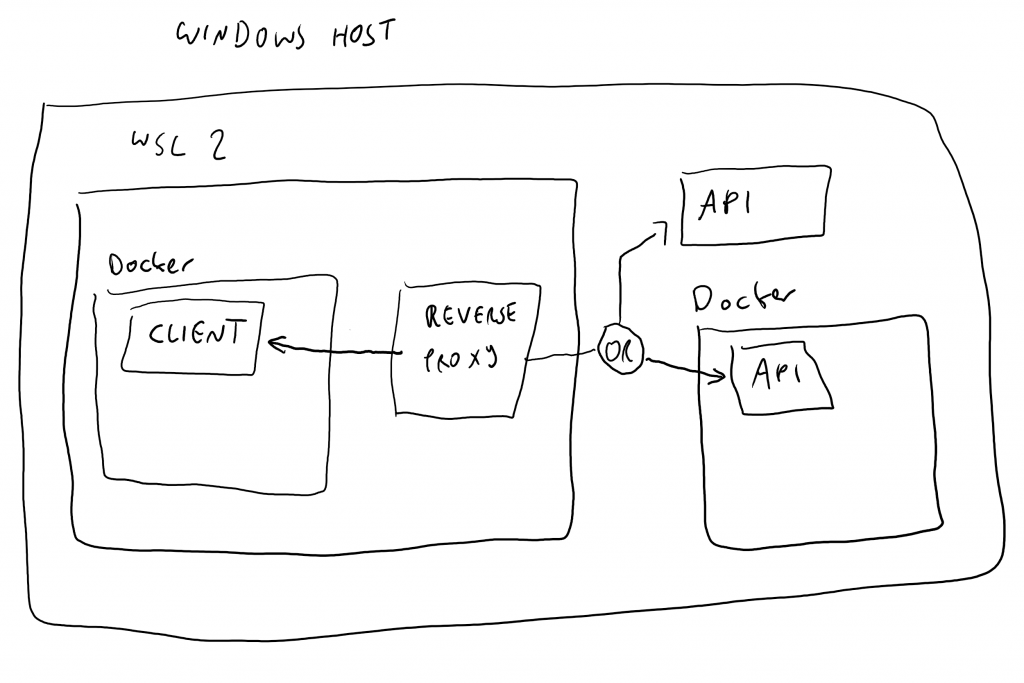
While working on a project employing a Client in WSL 2 (Windows Subsystem for Linux) and a Web-Api running on the Windows Host i noticed that there are several complex issues to resolve to get the communication going. The main issue was that the connection between these two instances was hard to establish and needed lots of maintenance after each reboot or network reconnect of the machine which the ecosystem was running on.
My Setup:
I’m running a Javascript client framework on WSL2 Docker and a ASP .Net 5 REST Server directly on the Windows (during dev), but the Server might be moved to a docker container on a windows host later.
It’s hard to set up a connection between WSL2 Docker and Windows Host/Windows Host Docker, a solution is to employ a Reverse proxy on the Client in WSL2 Docker and prompt the Windows Host Server to listen to the WSL Adapter IP Address.
Figure: Talking from WSL 2 to Windows Host or Windows Host Container using Rev. Proxy
TALK FROM LINUX
(SUBSYSTEM FOR WINDOWS)
The first task is to set up the WSL Adapter IP Address for your reverse proxy client-side in wsl.
Run a WSL2 Terminal, from your current (home/default) directory, run sudo nano .bashrc
Now, when you run your docker container in WSL, pass the environment variable WSL_WINDOWS_HOST
for example using this parameter (or a docker compose): -e APIHOST=$WSL_WINDOWS_HOST
Inside the container, you just have to configure the proxy to use
http://$APIHOST:[YOURPORT] (or https of course)
Well, that’s done, now the WSL Container wants to talk to Windows, but nobody is listening, story of my life, let’s fix that up.
LISTEN FROM WINDOWS
The second task to get this running was to notify the Application about the WSL Adapter IP Address. If you want to see the WSL Adapter IP Address just type “ipconfig” in powershell and find the WSL Adapter IPv4 Address.
You would want to inform your Server Application on the WSL Adapter IP Address, it needs to listen to this to receive connections from WSL.
To employ this IPv4 Address (make the Server listen to it) you want to change your launchSettings.json to listen to “http://[YOUR WSL ADAPTER IP ADDRESS]:[YOUR PORT]”
BUT: The WSL Adapter IP Address changes on every Windows Host reconnect to any network and consequently on every reboot and/or occasionally on wake-ups of the Host system (from Sleep or Hibernate). Normally, the IP-Address to listen to has to be configured in your (server) application, that means that you have to set it before the server application starts. If the IP constantly changes, it can be time consuming to look up the WSL Adapter IP Address every time and change the server settings accordingly.
Well that’s where Task Scheduler and Powershell play together, you will want to create a powershell script that reads the WSL Adapter IP Address and stores it in an environment variable, this environment variable can then be used by your server application.
Luckily, i took the time to figure out the Powershell and corresponding Task Scheduler settings:
This is the powershell script, here called “wsl_adapter_ip_to_env.ps1” and located in “C:/Sources/Scripts_Autorun” on the Windows host:
Create this file and open up the Task scheduler (Windows Key + R, then “taskschd.msc”)
Create a folder in the Task Scheduler Library (for better Script management), i created “Task Scheduler Library/WSL_DEV”
Create a new Task (NOT a Basic Task) with following Settings: GENERAL TAB: > Description: “Create ENV Variable WSL_ADAPTER_IP with WSL ADAPTER IP Address” > Security Options: Run only when user is logged in (your user) > Security Options: Run with highest privilegues
TRIGGERS TAB: > NEW TRIGGER: At logon (your user), Delay: 1 minute, enabled (this will update the WSL Adapter IP variable on logon) > NEW TRIGGER: On an event (basic), Log: Microsoft-Windows-NetWorkProfile/Operational, Source: NetworkProfile, Event ID: 10000, Enabled (this will update the WSL Adapter IP on every Windows Host Network reconnect, no matter which adapter or network type)
ACTIONS TAB: > NEW ACTION, START A PROGRAM Program/Script: powershell Add Arguments: -windowstyle hidden -ExecutionPolicy Bypass -file C:\Sources\Scripts_Autorun\wsl_adapter_ip_to_env.ps1
That’s it, now you will have an updated WSL Adapter IP Address Environment variable every time it changes.
There are multiple approaches to use this environment variable in a .Net API, currently i’m doing this in “Program.cs”
      public static IHostBuilder CreateHostBuilder(string[] args)
{
string wslAdapterIp = Environment.GetEnvironmentVariable("WSL_ADAPTER_IP");

return  Host.CreateDefaultBuilder(args)
            .ConfigureWebHostDefaults(webBuilder =>
            {
                webBuilder.UseStartup<Startup>();
                if (!String.IsNullOrEmpty(wslAdapterIp))
                {
                    Console.WriteLine("WSL_ADAPTER_IP Environment variable is set, using.");
                    webBuilder.UseUrls($"http://{wslAdapterIp}:5000","https://{wslAdapterIp}:5001");
                }
            });
    }
Note that you will need to pass this environment variable into the container via the “-e” flag or a docker-compose file, this example will work directly on the host using the env var that has been set by the task scheduler.
Well then, happy coding, leave a like, comment or whatever, until next time and don’t forget to bash in the bell icon and call the foo fighters. Bye!
(As usual, i’m open for constructive criticism, fixes and anything else that you might want to contribute)
Important Finding!
If WSL-Integration is active in Docker Desktop, none of this will work. Disable WSL-Integration under Docker-Desktop Settings -> General
This also implies that you install docker on your WSL (2) the same way as you would on a seperate machine.
Another important finding!
This setup worked for me for a few weeks, then suddenly stopped working.
I put some hours of figuring-out into it and noticed another problem:
It seems that the network settings are scrambled/broken when Docker Desktop starts before WSL2 – Docker.
That means that if Docker Desktop is started on Windows Startup as usual, WSL Docker will be unable to talk to the Windows Host.
To fix this very strange behavior (please somebody take the time to explain this to me?) i have 2 workarounds:
Disable Docker Desktop autostart and run only after WSL 2 Docker has been started.
Please note that the bashrc script on WSL will only run if WSL is starting, this means that if the WSL Adapter IP Changes during runtime, you need to restart WSL by closing all Windows and opening a new one or by rebooting the machine if you prefer.
Please note that Windows works in strange ways, for example, if you open a command line window or start a process, on start, the process will load all environment variables and not update them (ever, again), this means that if you are running Visual Studio or a Command Line and your Adapter IP Environment variable changes, you might want to restart Visual Studio or the Command window.
These behaviors cannot be influenced by me and are operating system dependant quirks, i’m already looking into some kind of force-reload mechanisms, but other than working with temporary files (which is NOT a good way) i could not yet come up with a solution for VS or WSL (though i found a force-reload for cmd/ps).
We use cookies on our website to give you the most relevant experience by remembering your preferences and repeat visits. By clicking “Accept All”, you consent to the use of ALL the cookies. However, you may visit "Cookie Settings" to provide a controlled consent.
This website uses cookies to improve your experience while you navigate through the website. Out of these, the cookies that are categorized as necessary are stored on your browser as they are essential for the working of basic functionalities of the website. We also use third-party cookies that help us analyze and understand how you use this website. These cookies will be stored in your browser only with your consent. You also have the option to opt-out of these cookies. But opting out of some of these cookies may affect your browsing experience.
Necessary cookies are absolutely essential for the website to function properly. These cookies ensure basic functionalities and security features of the website, anonymously.
Cookie
Duration
Description
cookielawinfo-checkbox-analytics
11 months
This cookie is set by GDPR Cookie Consent plugin. The cookie is used to store the user consent for the cookies in the category "Analytics".
cookielawinfo-checkbox-functional
11 months
The cookie is set by GDPR cookie consent to record the user consent for the cookies in the category "Functional".
cookielawinfo-checkbox-necessary
11 months
This cookie is set by GDPR Cookie Consent plugin. The cookies is used to store the user consent for the cookies in the category "Necessary".
cookielawinfo-checkbox-others
11 months
This cookie is set by GDPR Cookie Consent plugin. The cookie is used to store the user consent for the cookies in the category "Other.
cookielawinfo-checkbox-performance
11 months
This cookie is set by GDPR Cookie Consent plugin. The cookie is used to store the user consent for the cookies in the category "Performance".
viewed_cookie_policy
11 months
The cookie is set by the GDPR Cookie Consent plugin and is used to store whether or not user has consented to the use of cookies. It does not store any personal data.
Functional cookies help to perform certain functionalities like sharing the content of the website on social media platforms, collect feedbacks, and other third-party features.
Performance cookies are used to understand and analyze the key performance indexes of the website which helps in delivering a better user experience for the visitors.
Analytical cookies are used to understand how visitors interact with the website. These cookies help provide information on metrics the number of visitors, bounce rate, traffic source, etc.
Advertisement cookies are used to provide visitors with relevant ads and marketing campaigns. These cookies track visitors across websites and collect information to provide customized ads.
Recent Comments